
Folding Drone Build

Drones are an addiction. You start with something small to learn on, then move on to something bigger like a 3D Robotics drone. You build your it, you fly it, and it’s awesome. Then you crash it and turn your $600 quadcopter into a an unrecognizable pile of parts. At least that’s what happened to me. This is the last recorded footage of my “old” drone before I stuffed it into the roof of the Henry Ford Museum at Maker Faire Detroit last year. A very large man was dispatched to retrieve it (they wouldn’t let me up there, I asked) and after 30 minutes, he lowered a box and a bucket down to me containing what used to be my drone. It was a sad day – I took no pictures and just shoved the whole thing into my trunk.
What goes up must come down and what comes down can sometimes go back up. When I got home I examined the wreckage. The airframe was tangled mess of fiberglass and aluminum but somehow most of the electronics survived intact. Two of the motors were broken, the APM had a crack in the case but was otherwise functional, and everything else including my GoPro checked out (the case was shattered but the camera still worked.) Now, I had never been a huge fan of the 3D Robotics frame. Yes it was rigid and light but it was rather big. It was a pain to store and difficult to transport in my car or anywhere else. I decided I was going to rebuild my drone and solve this issue in time for Maker Faire NY 2013.
Design Goals
- Overall frame size must be similar to the original (I didn’t want to recalibrate the APM.)
- The drone must fold up and fit into a carry-on suitcase.
- Reuse as many parts as possible from the old drone.
- Have plenty of room for FPV equipment (if I ever wanted to go that route.)
- Be darn strong for when I crashed again.
- Us easily replaceable parts.
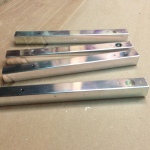
Before the crash I was looking at other DIY frames and came across a guy on the on the RC Groups forums that build something called the Fold-A-Quad. I really liked the looks of it but unfortunately he didn’t post his design files. No worries, I loaded up Vectric’s Aspire and started to work on my own version. I decided to make the top and bottom plates interchangeable for simplicity. I somehow managed to fit these plates, motor mounts, and camera riser onto 1 – 24″ x 12″ sheet of 0.063″ G10 fiberglass. I considered 3/4″ square aluminum tubing for the arms but I was concerned about weight – especially if this thing was going to carry FPV gear. I went to Home Depot for inspiration and found it in the bathroom isle. They had some 24″ aluminum towel bars that were cheap, light, and fairly strong. I love finding stuff locally – makes it easier to find a replacement when your break it.
I originally considered using nylon screws to keep the frame together but after seeing the prices on McMaster Carr I opted for traditional M3 screws and lock nuts. I also priced standoffs but wow – those things are pricey! I started thinking about alternatives and went down to the workbench. I had some small poly tubing so cut off several pieces to try to get a consistent length. That didn’t work. Then I thought – “hey, I have a 3D printer – I’ll CAD some up and print them!” So I did. And they worked!
-
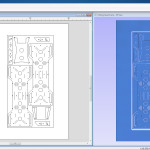
- The frame was designed in Vectric’s Aspire CAD/CAM package. I love this software.
-
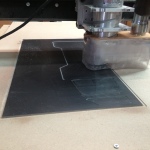
- Cutting the G10 using a 1/16 bit.
-
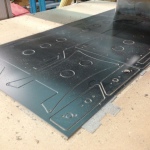
- Looking good!
-
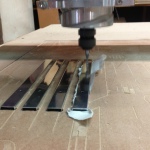
- I cut a jig to hold the arms during machining. I used newspaper to wedge the arms in tightly.
-
- Not bad for my fist time machining aluminum!
-
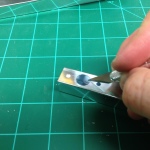
- Deburring with an Xacto knife.
-
- The motor mounts were intended to minimize vibration to the frame. I doubled these up later for increased stiffness.
-
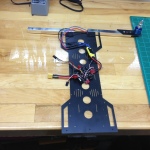
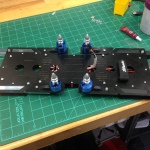
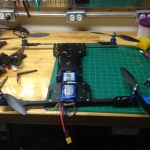
- Laying out the speed controls and wiring.
-
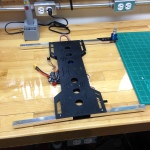
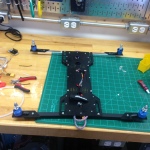
- Testing the upper deck for fitment.
-
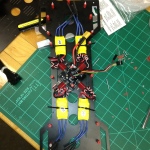
- Speed controls attached to the power distribution board. It’s a tight fit!
-

- A better angle.
-
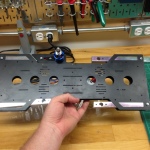
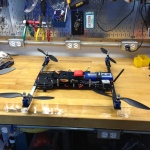
- It’s close but everything fits between the decks.
-
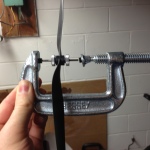
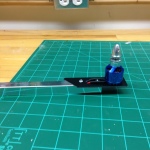
- My DIY prop balancer. Magnets and a C-clamp work well!
-
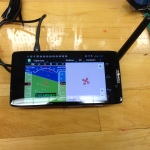
- Setting up telemetry using an Android phone running Mission Planner.
-
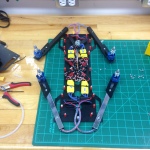
- Motors wired and installed. I used wire loom to protect the wires during the folding / unfolding.
-
- Attaching the upper deck. I like how clean it is!
-
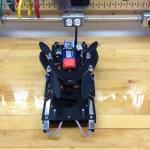
- In folded mode. Ready to add the APM.
-
- Believe it or not, it’s ready to fly! The APM and receiver are hidden under the top plate.
-
- Folded with props.
-

- I’m happy with how small it is folded.
-
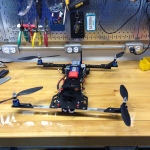
- Ready to fly.
-
- A different angle.
-
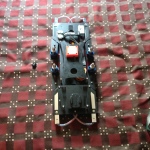
- The drone after unpacking it from the suitcase in New York! (Props removed to avoid damage.)
Files
- 3D Printed Parts (2 Legs, 20 Standoffs (print standoffs with skirt)) – GitHub
- Frame – GitHub
- Arms – GitHub
BOM
Frame
- 1 x Sheet of Black G10 Fiberglass – ACP Composites
- 22 – 25mm M3 Screws – McMaster Carr
- 8 – 30mm M3 Screws – McMaster Carr
- 8 – 10mm M3 Screws – McMaster Carr
- 8 – 6mm M3 Screws (for the motors) – McMaster Carr
- 8 – Split Lock Washers (for the 10mm screws not retained by a locknut) – McMaster Carr
- 24 – M3 Locknuts – McMaster Carr
- 8 – 20mm Aluminum Standoffs – McMaster Carr
- 8 – Brass Washer (one on each side of the arm pivot point – McMaster Carr
- 2 – 24″ 5/8″ Aluminum Towel Bars – I picked these up locally from Home Depot. Online from HDSupplysolutions.)
Electronics
- APM 2.5 with power module and XT60 connectors (Replaced by the APM 2.6) – Maker Shed
- 3DR uBlox GPS – Maker Shed
- Power Distribution Board – 3D Robotics
- 4 x 20A ESCs (Now using 30A OPTO SimonK) – Maker Shed
- 4 x 850 KV Motors – 3D Robotics
- 3DR Telemetry Set – Maker Shed
- Low voltage alarm – HobbyKing
- Turnigy 9XR Transmitter – HobbyKing
- FRSky Transmitter Module / Receiver Set – HobbyKing
- Upgraded 2.4GHZ Antenna – HobbyKing
- 2200mAh Transmitter Battery – HobbyKing
- 4000mAh 3S 30C Turnigy LiPo – HobbyKing
Here’s some footage taken by the folding drone at Maker Faire NY 2013. I did a little FPV flying as well with my DIY FPV setup – that will be another post.
Overall I’m happy with the folding drone frame, however I would make an improvement or two, mostly with the arms. I found that friction didn’t keep the arms in place and I ended up using a drill press with a 1/8″ bit to drill straight through the frame-arm-frame sandwich to put in a pin in each leg. In the next version I’d like to make a locking system of some kind.

Excellent DIY build. What is the frame weight if I may ask? Any videos of it flying?
I have a 3DR Y6 and crashed it (my fault). Fortunately only 1 motor and 3 props broke, but the arms did not, except for elongating the mounting holes on one.